
-
Getting Started
-
FAQs
-
Money Central
Adding A Class or Event Listing
With your Style Lynk subscription,
you are able to add unlimited listings from these 3 categories:
Types of listings:
- Professional: main listing type to show your services and allow clients to book appointments
- Classes & Events: a secondary listing type where you can offer classes or events and allow customers to register for classes / book tickets for events
- Styles: use this listing type to submit your best work to be featured in the Style Lynk Main Styles Galleries.
Now that we know the different listing types,
let’s go over a few important notes about Class or Event listings.
Important notes about Class or Event Listings:
- Classes & Event tickets are paid in full at the time of booking.
- You are responsible for providing the class or event as described on your listing
- Style Lynk generally considers all Class & Event ticket sales as final, with refunds given only if the class or event is cancelled. However, if you you would like to specify a different refund policy, be sure to indicate this on your listing for each specific Class or Event listing.
- In the event of service issues or customer disputes, you are responsible for processing any refunds that may be required. (*Style Lynk services fees are not refundable.)
Now that we’ve gotten that out of the way,
let’s get down to business and set up a CLASS or EVENT listing.
Accessing Your Dashboard
To access your dashboard to add or edit your listing, you can click on the user dropdown menu from the top right side of the screen or from the “My Listings” section of your Dashboard.

Getting started
In the first section, you’ll enter the basics:
- Listing name: what’s the name of the Class or Event?
- Description: tell prospective customers the details or overview of the Class or Event. This would be the place to let customers know about guest speakers, special deals, venue specifics, etc.
- Event category: what kind of event is this? Is this a class, photo shoot, promotion, fashion show, product showcase?
- Class specialties: if this class or event requires certain skills or feature specific skill training, select that here.
- Video: enter the url for a video about your products or services to display here (format https://www.samplesite.com)
- Gallery: what better way to attract people to your event than with pictures? Click in the box to add your desired Event images. In order for the image gallery to display at the top of you listing, you must have at least 4 images. If you have less than 4 images, they will be displayed below the “services” area on the page.
- Business contact information / Social media profiles: enter phone, website, and social handles here.
- Business address: enter your mappable business address here.
Now, we’ll move on to entering our Event date/time,
ticket availability, and booking information.
Event Date & Time
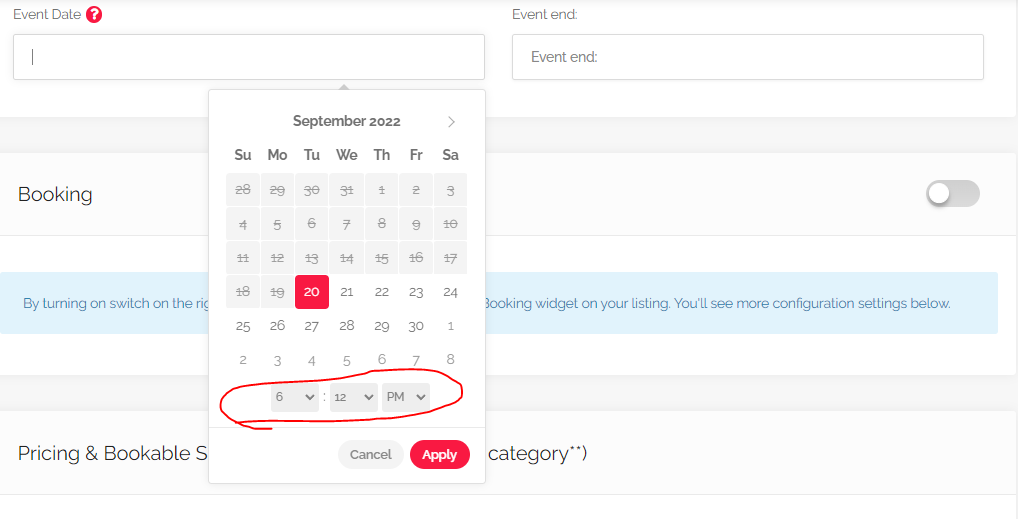
Click in the “Event Date” field and a calendar will pop up. Select the start date on the calendar, select the time at the bottom of the calendar, then select “apply”. Then do the same for the end date/ time. If the class / event is just for one day, enter the same date for the end date, enter the end time, and click “apply”.
Booking Widget

Turn this slider on if you want the Booking widget to appear on your listing. Convenient slide on / slide off if you need to temporarily suspend ticket sales or advertise that tickets will be on sale at a later date.
Ticket Prices & Setting
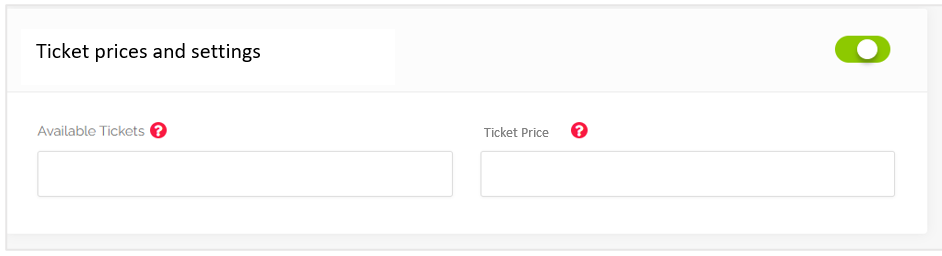
Turn this slider on to make event tickets available for purchase on your listing. Convenient slide on / slide off if tickets are sold out but you want still want to sell event merch. You can list event merch in the next section.
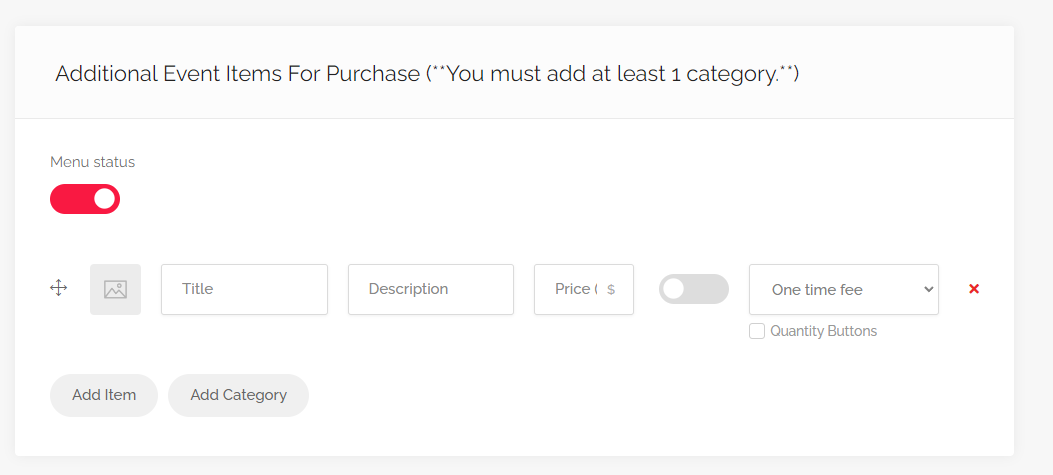
Additional Event Items For Purchase
back door view
front door view
This is where you will list any additional products or services you have available in addition to the general tickets. Turn this slider on to make these additional items appear on your Class / Event listing page. Each of these items has a slider that can be turned on or off to make it visible for customers to book.
Now this is VERY important:
FIRST, create at least one category for this section. (Suggestion: If you only have 1 category, name it “Additional Items”). THEN add items to the category. Categories and service items are moveable / drag n’ drop. If you don’t create a category FIRST, it will throw off the alignment on the page. Yes, we know, we’re working on that….
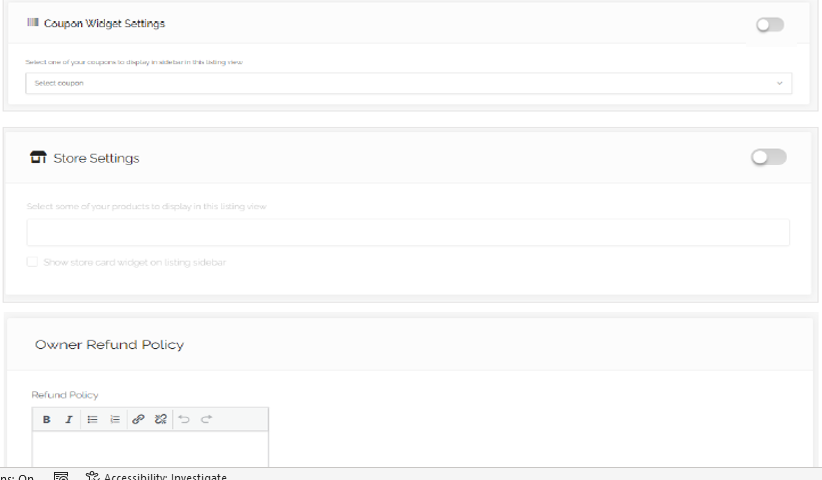
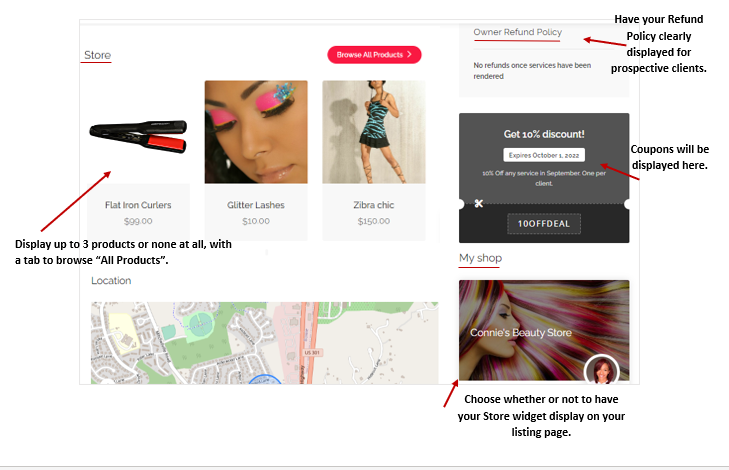
Store Widget, Products, & Coupons
While you can have unlimited listings, you only have 1 Store, and all of your listings are linked to your Store. If you have set up your Store, you can feature other items from your Store here by sliding this switch to the “on” position. You can show up to 3 products from your store in this area, and also make your Store widget visible in the right side of the screen. Check the box at the bottom of the “Store Settings” block to make your Store visible on your listing page.
Be sure to visit the Store Set-up page for instructions on how to set up your Store.
If you have created a coupon, you can click in the “Coupons” block to make a coupon visible on your class / event listing. Visit the Coupons page for details on how to create coupons.
back door view
front door view
Refund Policy
Style Lynk’s general policy for Class & Events is that aside from the class/ event being cancelled, there are no refunds. If you don’t want to offer refunds for your class/event, indicate that here. However, if you would like to offer refunds or any other policy regarding your class or event, enter that here. *This field is required.
All that’s left to do now is to “Preview” your listing. If you need to make any changes, “edit”. But if it looks great, “submit”.
Did you know...
You can turn several features on and off when you edit your listing pages, but:
- the Coupon widget will not appear on your listing page until after you create a coupon. Once you create a coupon, the widget will be visible to add coupons for your products or services.
- the Store widget will not be visible on your listing page until after you set up your Store. Once you set up your Store, the Store widget will appear on your listings edit page for you to turn off or on.